Advanced Graphical User Interface Components
We cover the more complex parts of a GUI, and look at the more advanced layout managers
JTextArea's provide an area for manipulating multiple lines of text.
| JTextArea example | import java.awt.*;
import java.awt.event.*;
import javax.swing.*;
public class TextAreaDemo extends JFrame {
private JTextArea t1, t2;
private JButton copy;
public TextAreaDemo()
{
super( "TextArea Demo" );
Box b = Box.createHorizontalBox();
String s = "This is a demo string to\n" +
"illustrate copying text\n" +
"from one TextArea to \n" +
"another TextArea using an\n"+
"external event\n";
t1 = new JTextArea( s, 10, 15 );
b.add( new JScrollPane( t1 ) );
copy = new JButton( "Copy >>>" );
copy.addActionListener(
new ActionListener() {
public void actionPerformed( ActionEvent e )
{
t2.setText( t1.getSelectedText() );
}
}
);
b.add( copy );
t2 = new JTextArea( 10, 15 );
t2.setEditable( false );
b.add( new JScrollPane( t2 ) );
Container c = getContentPane();
c.add( b ); // Box placed in BorderLayout.CENTER
setSize( 425, 200 );
show();
}
public static void main( String args[] )
{
TextAreaDemo app = new TextAreaDemo();
app.addWindowListener(
new WindowAdapter() {
public void windowClosing( WindowEvent e )
{
System.exit( 0 );
}
}
);
}
}
|
Creating a Customized subclass of JPanel
On occasions Swing GUI components lead to improper display of the GUI components or the graphics, because Swing GUI components are displayed using the same graphics techniques as the drawings and are displayed in the same area as the drawings, the order in which the GUI components are displayed and the drawing is performed may result in drawing over the the GUI components or GUI components obscuring the grahics, to fix this problem we separate the GUI and the graphics by creating dedicated drawing areas as subclass of JPanel.
| example | // CustomPanel Class |
JSliders allow you to select from a range of integer values, they can be horizontal or vertical. To can use the left and right arrows or the page-up or page-down keys to move the slider.
| JSlider example | // SliderDemo Class
import java.awt.*;
import java.awt.event.*;
import javax.swing.*;
import javax.swing.event.*;
public class SliderDemo extends JFrame {
private JSlider diameter;
private OvalPanel myPanel;
public SliderDemo()
{
super( "Slider Demo" );
myPanel = new OvalPanel();
myPanel.setBackground( Color.yellow );
diameter = new JSlider( SwingConstants.HORIZONTAL,
0, 200, 10 );
diameter.setMajorTickSpacing( 10 );
diameter.setPaintTicks( true );
diameter.addChangeListener(
new ChangeListener() {
public void stateChanged( ChangeEvent e )
{
myPanel.setDiameter( diameter.getValue() );
}
}
);
Container c = getContentPane();
c.add( diameter, BorderLayout.SOUTH );
c.add( myPanel, BorderLayout.CENTER );
setSize( 220, 270 );
show();
}
public static void main( String args[] )
{
SliderDemo app = new SliderDemo();
app.addWindowListener(
new WindowAdapter() {
public void windowClosing( WindowEvent e )
{
System.exit( 0 );
}
}
);
}
}
// OvalPanel Class
import java.awt.*;
import javax.swing.*;
public class OvalPanel extends JPanel {
private int diameter = 10;
public void paintComponent( Graphics g )
{
super.paintComponent( g );
g.fillOval( 10, 10, diameter, diameter );
}
public void setDiameter( int d )
{
diameter = ( d >= 0 ? d : 10 ); // default diameter 10
repaint();
}
// the following methods are used by layout managers
public Dimension getPreferredSize()
{
return new Dimension( 200, 200 );
}
public Dimension getMinimumSize()
{
return getPreferredSize();
}
}
|
Programs that execute as Applets or Applications
Sometimes you want a program to run as either a stand-alone program or as a web applet.
| example | // DrawShapes class
import java.awt.*;
import java.awt.event.*;
import javax.swing.*;
public class DrawShapes extends JApplet {
private JButton choices[];
private String names[] = { "Line", "Rectangle", "Oval" };
private JPanel buttonPanel;
private DrawPanel drawingArea;
private int width = 300, height = 200;
public void init()
{
drawingArea = new DrawPanel( width, height );
choices = new JButton[ names.length ];
buttonPanel = new JPanel();
buttonPanel.setLayout(
new GridLayout( 1, choices.length ) );
ButtonHandler handler = new ButtonHandler();
for ( int i = 0; i < choices.length; i++ ) {
choices[ i ] = new JButton( names[ i ] );
buttonPanel.add( choices[ i ] );
choices[ i ].addActionListener( handler );
}
Container c = getContentPane();
c.add( buttonPanel, BorderLayout.NORTH );
c.add( drawingArea, BorderLayout.CENTER );
}
public void setWidth( int w )
{ width = ( w >= 0 ? w : 300 ); }
public void setHeight( int h )
{ height = ( h >= 0 ? h : 200 ); }
public static void main( String args[] )
{
int width, height;
if ( args.length != 2 ) { // no command-line arguments
width = 300;
height = 200;
}
else {
width = Integer.parseInt( args[ 0 ] );
height = Integer.parseInt( args[ 1 ] );
}
// create window in which applet will execute
JFrame applicationWindow =
new JFrame( "An applet running as an application" );
applicationWindow.addWindowListener(
new WindowAdapter() {
public void windowClosing( WindowEvent e )
{
System.exit( 0 );
}
}
);
// create one applet instance
DrawShapes appletObject = new DrawShapes();
appletObject.setWidth( width );
appletObject.setHeight( height );
// call applet's init and start methods
appletObject.init();
appletObject.start();
// attach applet to center of window
applicationWindow.getContentPane().add( appletObject );
// set the window's size
applicationWindow.setSize( width, height );
// showing the window causes all GUI components
// attached to the window to be painted
applicationWindow.show();
}
private class ButtonHandler implements ActionListener {
public void actionPerformed( ActionEvent e )
{
for ( int i = 0; i < choices.length; i++ )
if ( e.getSource() == choices[ i ] ) {
drawingArea.setCurrentChoice( i );
break;
}
}
}
}
// subclass of JPanel to allow drawing in a separate area
class DrawPanel extends JPanel {
private int currentChoice = -1; // don't draw first time
private int width = 100, height = 100;
public DrawPanel( int w, int h )
{
width = ( w >= 0 ? w : 100 );
height = ( h >= 0 ? h : 100 );
}
public void paintComponent( Graphics g )
{
super.paintComponent( g );
switch( currentChoice ) {
case 0:
g.drawLine( randomX(), randomY(),
randomX(), randomY() );
break;
case 1:
g.drawRect( randomX(), randomY(),
randomX(), randomY() );
break;
case 2:
g.drawOval( randomX(), randomY(),
randomX(), randomY() );
break;
}
}
public void setCurrentChoice( int c )
{
currentChoice = c;
repaint();
}
private int randomX()
{ return (int) ( Math.random() * width ); }
private int randomY()
{ return (int) ( Math.random() * height ); }
}
// HTML Code
<html> |
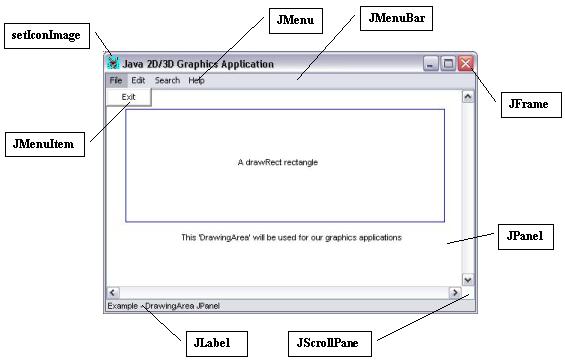
Menus are part of GUI, they allow the user to perform actions without cluttering up the interface. There are a number of components to menus
The below diagram explains the where the jmenu components are
Now for an example
| JMenu example | import javax.swing.*;
import java.awt.event.*;
import java.awt.*;
public class MenuTest extends JFrame {
private Color colorValues[] =
{ Color.black, Color.blue, Color.red, Color.green };
private JRadioButtonMenuItem colorItems[], fonts[];
private JCheckBoxMenuItem styleItems[];
private JLabel display;
private ButtonGroup fontGroup, colorGroup;
private int style;
public MenuTest()
{
super( "Using JMenus" );
JMenuBar bar = new JMenuBar(); // create menubar
setJMenuBar( bar ); // set the menubar for the JFrame
// create File menu and Exit menu item
JMenu fileMenu = new JMenu( "File" );
fileMenu.setMnemonic( 'F' );
JMenuItem aboutItem = new JMenuItem( "About..." );
aboutItem.setMnemonic( 'A' );
aboutItem.addActionListener(
new ActionListener() {
public void actionPerformed( ActionEvent e )
{
JOptionPane.showMessageDialog( MenuTest.this,
"This is an example\nof using menus",
"About", JOptionPane.PLAIN_MESSAGE );
}
}
);
fileMenu.add( aboutItem );
JMenuItem exitItem = new JMenuItem( "Exit" );
exitItem.setMnemonic( 'x' );
exitItem.addActionListener(
new ActionListener() {
public void actionPerformed( ActionEvent e )
{
System.exit( 0 );
}
}
);
fileMenu.add( exitItem );
bar.add( fileMenu ); // add File menu
// create the Format menu, its submenus and menu items
JMenu formatMenu = new JMenu( "Format" );
formatMenu.setMnemonic( 'r' );
// create Color submenu
String colors[] =
{ "Black", "Blue", "Red", "Green" };
JMenu colorMenu = new JMenu( "Color" );
colorMenu.setMnemonic( 'C' );
colorItems = new JRadioButtonMenuItem[ colors.length ];
colorGroup = new ButtonGroup();
ItemHandler itemHandler = new ItemHandler();
for ( int i = 0; i < colors.length; i++ ) {
colorItems[ i ] =
new JRadioButtonMenuItem( colors[ i ] );
colorMenu.add( colorItems[ i ] );
colorGroup.add( colorItems[ i ] );
colorItems[ i ].addActionListener( itemHandler );
}
colorItems[ 0 ].setSelected( true );
formatMenu.add( colorMenu );
formatMenu.addSeparator();
// create Font submenu
String fontNames[] =
{ "TimesRoman", "Courier", "Helvetica" };
JMenu fontMenu = new JMenu( "Font" );
fontMenu.setMnemonic( 'n' );
fonts = new JRadioButtonMenuItem[ fontNames.length ];
fontGroup = new ButtonGroup();
for ( int i = 0; i < fonts.length; i++ ) {
fonts[ i ] =
new JRadioButtonMenuItem( fontNames[ i ] );
fontMenu.add( fonts[ i ] );
fontGroup.add( fonts[ i ] );
fonts[ i ].addActionListener( itemHandler );
}
fonts[ 0 ].setSelected( true );
fontMenu.addSeparator();
String styleNames[] = { "Bold", "Italic" };
styleItems = new JCheckBoxMenuItem[ styleNames.length ];
StyleHandler styleHandler = new StyleHandler();
for ( int i = 0; i < styleNames.length; i++ ) {
styleItems[ i ] =
new JCheckBoxMenuItem( styleNames[ i ] );
fontMenu.add( styleItems[ i ] );
styleItems[ i ].addItemListener( styleHandler );
}
formatMenu.add( fontMenu );
bar.add( formatMenu ); // add Format menu
display = new JLabel(
"Sample Text", SwingConstants.CENTER );
display.setForeground( colorValues[ 0 ] );
display.setFont(
new Font( "TimesRoman", Font.PLAIN, 72 ) );
getContentPane().setBackground( Color.cyan );
getContentPane().add( display, BorderLayout.CENTER );
setSize( 500, 200 );
show();
}
public static void main( String args[] )
{
MenuTest app = new MenuTest();
app.addWindowListener(
new WindowAdapter() {
public void windowClosing( WindowEvent e )
{
System.exit( 0 );
}
}
);
}
class ItemHandler implements ActionListener {
public void actionPerformed( ActionEvent e )
{
for ( int i = 0; i < colorItems.length; i++ )
if ( colorItems[ i ].isSelected() ) {
display.setForeground( colorValues[ i ] );
break;
}
for ( int i = 0; i < fonts.length; i++ )
if ( e.getSource() == fonts[ i ] ) {
display.setFont( new Font(
fonts[ i ].getText(), style, 72 ) );
break;
}
repaint();
}
}
class StyleHandler implements ItemListener {
public void itemStateChanged( ItemEvent e )
{
style = 0;
if ( styleItems[ 0 ].isSelected() )
style += Font.BOLD;
if ( styleItems[ 1 ].isSelected() )
style += Font.ITALIC;
display.setFont( new Font(
display.getFont().getName(), style, 72 ) );
repaint();
}
}
}
|
Most browsers will stop popup menus, but here is an example of how to use a JPopupMenu
| JPopupMenu | import javax.swing.*;
import java.awt.event.*;
import java.awt.*;
public class PopupTest extends JFrame {
private JRadioButtonMenuItem items[];
private Color colorValues[] = { Color.blue, Color.yellow, Color.red };
public PopupTest()
{
super( "Using JPopupMenus" );
final JPopupMenu popupMenu = new JPopupMenu();
ItemHandler handler = new ItemHandler();
String colors[] = { "Blue", "Yellow", "Red" };
ButtonGroup colorGroup = new ButtonGroup();
items = new JRadioButtonMenuItem[ 3 ];
// construct each menu item and add to popup menu; also
// enable event handling for each menu item
for ( int i = 0; i < items.length; i++ ) {
items[ i ] = new JRadioButtonMenuItem( colors[ i ] );
popupMenu.add( items[ i ] );
colorGroup.add( items[ i ] );
items[ i ].addActionListener( handler );
}
getContentPane().setBackground( Color.white );
// define a MouseListener for the window that displays
// a JPopupMenu when the popup trigger event occurs
addMouseListener(
new MouseAdapter() {
public void mousePressed( MouseEvent e )
{ checkForTriggerEvent( e ); }
public void mouseReleased( MouseEvent e )
{ checkForTriggerEvent( e ); }
private void checkForTriggerEvent( MouseEvent e )
{
if ( e.isPopupTrigger() )
popupMenu.show( e.getComponent(),
e.getX(), e.getY() );
}
}
);
setSize( 300, 200 );
show();
}
public static void main( String args[] )
{
PopupTest app = new PopupTest();
app.addWindowListener(
new WindowAdapter() {
public void windowClosing( WindowEvent e )
{
System.exit( 0 );
}
}
);
}
private class ItemHandler implements ActionListener {
public void actionPerformed( ActionEvent e )
{
// determine which menu item was selected
for ( int i = 0; i < items.length; i++ )
if ( e.getSource() == items[ i ] ) {
getContentPane().setBackground(
colorValues[ i ] );
repaint();
return;
}
}
}
}
|
A program that uses Java Abstract Windowing toolkit GUI components takes on the look-and-feel of the platform on which the program executes.
To demonstrate this here is an example
| Look and Feel example | import javax.swing.*;
import java.awt.*;
import java.awt.event.*;
public class LookAndFeelDemo extends JFrame {
private String strings[] = { "Metal", "Motif", "Windows" };
private UIManager.LookAndFeelInfo looks[];
private JRadioButton radio[];
private ButtonGroup group;
private JButton button;
private JLabel label;
private JComboBox comboBox;
public LookAndFeelDemo()
{
super( "Look and Feel Demo" );
Container c = getContentPane();
JPanel northPanel = new JPanel();
northPanel.setLayout( new GridLayout( 3, 1, 0, 5 ) );
label = new JLabel( "This is a Metal look-and-feel", SwingConstants.CENTER );
northPanel.add( label );
button = new JButton( "JButton" );
northPanel.add( button );
comboBox = new JComboBox( strings );
northPanel.add( comboBox );
c.add( northPanel, BorderLayout.NORTH );
JPanel southPanel = new JPanel();
radio = new JRadioButton[ strings.length ];
group = new ButtonGroup();
ItemHandler handler = new ItemHandler();
southPanel.setLayout(
new GridLayout( 1, radio.length ) );
for ( int i = 0; i < radio.length; i++ ) {
radio[ i ] = new JRadioButton( strings[ i ] );
radio[ i ].addItemListener( handler );
group.add( radio[ i ] );
southPanel.add( radio[ i ] );
}
c.add( southPanel, BorderLayout.SOUTH );
// get the installed look-and-feel information
looks = UIManager.getInstalledLookAndFeels();
setSize( 300, 200 );
show();
radio[ 0 ].setSelected( true );
}
private void changeTheLookAndFeel( int value )
{
try {
UIManager.setLookAndFeel( looks[ value ].getClassName() );
SwingUtilities.updateComponentTreeUI( this );
}
catch ( Exception e ) {
e.printStackTrace();
}
}
public static void main( String args[] )
{
LookAndFeelDemo dx = new LookAndFeelDemo();
dx.addWindowListener(
new WindowAdapter() {
public void windowClosing( WindowEvent e )
{
System.exit( 0 );
}
}
);
}
private class ItemHandler implements ItemListener {
public void itemStateChanged( ItemEvent e )
{
for ( int i = 0; i < radio.length; i++ )
if ( radio[ i ].isSelected() ) {
label.setText( "This is a " +
strings[ i ] + " look-and-feel" );
comboBox.setSelectedIndex( i );
changeTheLookAndFeel( i );
}
}
}
}
|
JDesktopPane and JInternalFrame
Lots of applications allow to to have multiple documents open at any oen time, for example word could have a number of documents open which you are working on, JDesktopPane and JInternalFrame allow to open multiple documents.
| JDesktopPane and JInternalFrame example | import javax.swing.*;
import java.awt.event.*;
import java.awt.*;
public class DesktopTest extends JFrame {
public DesktopTest()
{
super( "Using a JDesktopPane" );
JMenuBar bar = new JMenuBar();
JMenu addMenu = new JMenu( "Add" );
JMenuItem newFrame = new JMenuItem( "Internal Frame" );
addMenu.add( newFrame );
bar.add( addMenu );
setJMenuBar( bar );
final JDesktopPane theDesktop = new JDesktopPane();
getContentPane().add( theDesktop );
newFrame.addActionListener(
new ActionListener() {
public void actionPerformed( ActionEvent e ) {
JInternalFrame frame =
new JInternalFrame(
"Internal Frame",
true, true, true, true );
Container c = frame.getContentPane();
MyJPanel panel = new MyJPanel();
c.add( panel, BorderLayout.CENTER );
frame.setSize(
panel.getImageWidthHeight().width,
panel.getImageWidthHeight().height );
frame.setOpaque( true );
theDesktop.add( frame );
}
}
);
setSize( 500, 400 );
show();
}
public static void main( String args[] )
{
DesktopTest app = new DesktopTest();
app.addWindowListener(
new WindowAdapter() {
public void windowClosing( WindowEvent e )
{
System.exit( 0 );
}
}
);
}
}
class MyJPanel extends JPanel {
private ImageIcon imgIcon;
public MyJPanel()
{
imgIcon = new ImageIcon( "jhtp3.gif" );
}
public void paintComponent( Graphics g )
{
imgIcon.paintIcon( this, g, 0, 0 );
}
public Dimension getImageWidthHeight()
{
return new Dimension( imgIcon.getIconWidth(),
imgIcon.getIconHeight() );
}
}
you can obtain the image from here
|