Java Layout Managers
The GUI is made up of a number of components, the Layout Managers affect the content pane.
Layout Managers are provided to arrange GUI components on a container for presentation purposes. This allows the programmer to concentrate on the basic "look and feel" and lets the layout managers process most of the layout details.
There are many layout managers
Basic Layout Managers |
|
| FlowLayout | Default for java.applet.Applet, java.awt.Panel and java.swing.JPanel. Places components sequentially (left to right) in the order they were added. You can specify the order. |
| BorderLayout | Default for the content panes of JFrame and JApplets. Arranges the components into five areas: North, South East, West and Center |
| GridLayout | Arranges the components into rows and columns |
Advanced Layout Managers |
|
| BoxLayout | Allows components to be arranged left-to-right or top-to-bottom in a container |
| CardLayout | Stacks components like a deck of cards |
| GridBagLayout | similar to GridLayout. unlike GridLayout each component size can vary and components can be added in any order. |
Here are 5 of the layout managers.
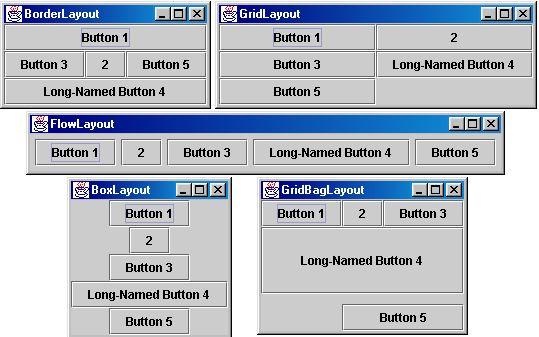
FlowLayout
This is the most basic layout manager, components are placed from left to right as they were added, when the edge is reached the components are put on the next line. You can align the components left, right or center (default).
| FlowLayout example | import java.awt.*;
import java.awt.event.*;
import javax.swing.*;
public class FlowLayoutDemo extends JFrame {
private JButton left, center, right;
private Container c;
private FlowLayout layout;
public FlowLayoutDemo()
{
super( "FlowLayout Demo" );
layout = new FlowLayout();
c = getContentPane();
c.setLayout( layout );
left = new JButton( "Left" );
left.addActionListener(
new ActionListener() {
public void actionPerformed( ActionEvent e )
{
layout.setAlignment( FlowLayout.LEFT );
// re-align attached components
layout.layoutContainer( c );
}
}
);
c.add( left );
center = new JButton( "Center" );
center.addActionListener(
new ActionListener() {
public void actionPerformed( ActionEvent e )
{
layout.setAlignment( FlowLayout.CENTER );
// re-align attached components
layout.layoutContainer( c );
}
}
);
c.add( center );
right = new JButton( "Right" );
right.addActionListener(
new ActionListener() {
public void actionPerformed( ActionEvent e )
{
layout.setAlignment( FlowLayout.RIGHT );
// re-align attached components
layout.layoutContainer( c );
}
}
);
c.add( right );
setSize( 300, 75 );
show();
}
public static void main( String args[] )
{
FlowLayoutDemo app = new FlowLayoutDemo();
app.addWindowListener(
new WindowAdapter() {
public void windowClosing( WindowEvent e )
{
System.exit( 0 );
}
}
);
}
} |
BorderLayout
Components are positioned in a five different areas: North, South, East, West or Center. If you do not specify a particular area the other areas will use this space by expanding.
| BorderLayout example | import java.awt.*;
import java.awt.event.*;
import javax.swing.*;
public class BorderLayoutDemo extends JFrame
implements ActionListener {
private JButton b[];
private String names[] =
{ "Hide North", "Hide South", "Hide East",
"Hide West", "Hide Center" };
private BorderLayout layout;
public BorderLayoutDemo()
{
super( "BorderLayout Demo" );
layout = new BorderLayout( 5, 5 );
Container c = getContentPane();
c.setLayout( layout );
// instantiate button objects
b = new JButton[ names.length ];
for ( int i = 0; i < names.length; i++ ) {
b[ i ] = new JButton( names[ i ] );
b[ i ].addActionListener( this );
}
// order not important
c.add( b[ 0 ], BorderLayout.NORTH ); // North position
c.add( b[ 1 ], BorderLayout.SOUTH ); // South position
c.add( b[ 2 ], BorderLayout.EAST ); // East position
c.add( b[ 3 ], BorderLayout.WEST ); // West position
c.add( b[ 4 ], BorderLayout.CENTER ); // Center position
setSize( 300, 200 );
show();
}
public void actionPerformed( ActionEvent e )
{
for ( int i = 0; i < b.length; i++ )
if ( e.getSource() == b[ i ] )
b[ i ].setVisible( false );
else
b[ i ].setVisible( true );
// re-layout the content pane
layout.layoutContainer( getContentPane() );
}
public static void main( String args[] )
{
BorderLayoutDemo app = new BorderLayoutDemo();
app.addWindowListener(
new WindowAdapter() {
public void windowClosing( WindowEvent e )
{
System.exit( 0 );
}
}
);
}
} |
GridLayout
This layout manager divides the container into a grid so that components can be placed in rows and columns. Every component will have the same width and height, the components are added to the grid starting at the top left cell and proceding left-to-right until the row is full, then go onto the next row.
| GridLayout | import java.awt.*;
import java.awt.event.*;
import javax.swing.*;
public class GridLayoutDemo extends JFrame implements ActionListener {
private JButton b[];
private String names[] = { "one", "two", "three", "four", "five", "six" };
private boolean toggle = true;
private Container c;
private GridLayout grid1, grid2;
public GridLayoutDemo()
{
super( "GridLayout Demo" );
grid1 = new GridLayout( 2, 3, 5, 5 );
grid2 = new GridLayout( 3, 2 );
c = getContentPane();
c.setLayout( grid1 );
// create and add buttons
b = new JButton[ names.length ];
for (int i = 0; i < names.length; i++ ) {
b[ i ] = new JButton( names[ i ] );
b[ i ].addActionListener( this );
c.add( b[ i ] );
}
setSize( 300, 150 );
show();
}
public void actionPerformed( ActionEvent e )
{
if ( toggle )
c.setLayout( grid2 );
else
c.setLayout( grid1 );
toggle = !toggle;
c.validate();
}
public static void main( String args[] )
{
GridLayoutDemo app = new GridLayoutDemo();
app.addWindowListener(
new WindowAdapter() {
public void windowClosing( WindowEvent e )
{
System.exit( 0 );
}
}
);
}
} |
BoxLayout
Arranges GUI components horizontally along the x-axis or vertically along the y-axis of a container.
| BoxLayout | import javax.swing.*;
import java.awt.*;
import java.awt.event.*;
public class BoxLayoutDemo extends JFrame {
public BoxLayoutDemo()
{
super( "Demostrating BoxLayout" );
final int SIZE = 3;
Container c = getContentPane();
c.setLayout( new BorderLayout( 30, 30 ) );
Box boxes[] = new Box[ 4 ];
boxes[ 0 ] = Box.createHorizontalBox();
boxes[ 1 ] = Box.createVerticalBox();
boxes[ 2 ] = Box.createHorizontalBox();
boxes[ 3 ] = Box.createVerticalBox();
// add buttons to boxes[ 0 ]
for ( int i = 0; i < SIZE; i++ )
boxes[ 0 ].add( new JButton( "boxes[0]: " + i ) );
// create strut and add buttons to boxes[ 1 ]
for ( int i = 0; i < SIZE; i++ ) {
boxes[ 1 ].add( Box.createVerticalStrut( 25 ) );
boxes[ 1 ].add( new JButton( "boxes[1]: " + i ) );
}
// create horizontal glue and add buttons to boxes[ 2 ]
for ( int i = 0; i < SIZE; i++ ) {
boxes[ 2 ].add( Box.createHorizontalGlue() );
boxes[ 2 ].add( new JButton( "boxes[2]: " + i ) );
}
// create rigid area and add buttons to boxes[ 3 ]
for ( int i = 0; i < SIZE; i++ ) {
boxes[ 3 ].add(
Box.createRigidArea( new Dimension( 12, 8 ) ) );
boxes[ 3 ].add( new JButton( "boxes[3]: " + i ) );
}
// create horizontal glue and add buttons to panel
JPanel panel = new JPanel();
panel.setLayout(
new BoxLayout( panel, BoxLayout.Y_AXIS ) );
for ( int i = 0; i < SIZE; i++ ) {
panel.add( Box.createGlue() );
panel.add( new JButton( "panel: " + i ) );
}
// place panels on frame
c.add( boxes[ 0 ], BorderLayout.NORTH );
c.add( boxes[ 1 ], BorderLayout.EAST );
c.add( boxes[ 2 ], BorderLayout.SOUTH );
c.add( boxes[ 3 ], BorderLayout.WEST );
c.add( panel, BorderLayout.CENTER );
setSize( 350, 300 );
show();
}
public static void main( String args[] )
{
BoxLayoutDemo app = new BoxLayoutDemo();
app.addWindowListener(
new WindowAdapter() {
public void windowClosing( WindowEvent e )
{
System.exit( 0 );
}
}
);
}
}
|
CardLayout
arranges GUI components into a "deck" of cards where only the top card is visable, any card in the deck can be placed at the top (thus visable). Each card is normally a Panel which can use any layout manager.
CardLayout |
import javax.swing.*;
import java.awt.*;
import java.awt.event.*;


public class CardDeck extends JFrame implements ActionListener {
   private CardLayout cardManager;
   private JPanel deck;
   private JButton controls[];
   private String names[] = { "First card", "Next card", "Previous card", "Last card" };

   public CardDeck()
   {
      super( "CardLayout " );

      Container c = getContentPane();

      // create the JPanel with CardLayout
      deck = new JPanel();
      cardManager = new CardLayout();
      deck.setLayout( cardManager );

      // set up card1 and add it to JPanel deck
      JLabel label1 = new JLabel( "card one", SwingConstants.CENTER );
      JPanel card1 = new JPanel();
      card1.add( label1 );
      deck.add( card1, label1.getText() ); // add card to deck

      // set up card2 and add it to JPanel deck
      JLabel label2 = new JLabel( "card two", SwingConstants.CENTER );
      JPanel card2 = new JPanel();
      card2.setBackground( Color.yellow );
      card2.add( label2 );
      deck.add( card2, label2.getText() ); // add card to deck

      // set up card3 and add it to JPanel deck
      JLabel label3 = new JLabel( "card three" );
      JPanel card3 = new JPanel();
      card3.setLayout( new BorderLayout() );
      card3.add( new JButton( "North" ), BorderLayout.NORTH );
      card3.add( new JButton( "West" ), BorderLayout.WEST );
      card3.add( new JButton( "East" ), BorderLayout.EAST );
      card3.add( new JButton( "South" ), BorderLayout.SOUTH );
      card3.add( label3, BorderLayout.CENTER );
      deck.add( card3, label3.getText() ); // add card to deck

      // create and layout buttons that will control deck
      JPanel buttons = new JPanel();
      buttons.setLayout( new GridLayout( 2, 2 ) );
      controls = new JButton[ names.length ];

      for ( int i = 0; i < controls.length; i++ ) {
         controls[ i ] = new JButton( names[ i ] );
         controls[ i ].addActionListener( this );
         buttons.add( controls[ i ] );
      }

      // add JPanel deck and JPanel buttons to the applet
      c.add( buttons, BorderLayout.WEST );
      c.add( deck, BorderLayout.EAST );

      setSize( 450, 200 );
      show();
   }

   public void actionPerformed( ActionEvent e )
   {
      if ( e.getSource() == controls[ 0 ] )
         cardManager.first( deck ); // show first card
      else if ( e.getSource() == controls[ 1 ] )
         cardManager.next( deck );  // show next card
      else if ( e.getSource() == controls[ 2 ] )
         cardManager.previous( deck );  // show previous card
      else if ( e.getSource() == controls[ 3 ] )
         cardManager.last( deck );  // show last card
   }

   public static void main( String args[] )
   {
      CardDeck cardDeckDemo = new CardDeck();

      cardDeckDemo.addWindowListener(
         new WindowAdapter() {
            public void windowClosing( WindowEvent e )
            {
               System.exit( 0 );
            }
         }
      );
   }
}
|
GridBagLayout
This is the most complex of the layout managers, it is the same as GridLayout but more flexible as the components can be different sizes.
| GridBagLayout | import javax.swing.*;
import java.awt.*;
import java.awt.event.*;
public class GridBagDemo extends JFrame {
private Container container;
private GridBagLayout gbLayout;
private GridBagConstraints gbConstraints;
public GridBagDemo()
{
super( "GridBagLayout" );
container = getContentPane();
gbLayout = new GridBagLayout();
container.setLayout( gbLayout );
// instantiate gridbag constraints
gbConstraints = new GridBagConstraints();
JTextArea ta = new JTextArea( "TextArea1", 5, 10 );
JTextArea tx = new JTextArea( "TextArea2", 2, 2 );
String names[] = { "Iron", "Steel", "Brass" };
JComboBox cb = new JComboBox( names );
JTextField tf = new JTextField( "TextField" );
JButton b1 = new JButton( "Button 1" );
JButton b2 = new JButton( "Button 2" );
JButton b3 = new JButton( "Button 3" );
// text area
// weightx and weighty are both 0: the default
// anchor for all components is CENTER: the default
gbConstraints.fill = GridBagConstraints.BOTH;
addComponent( ta, 0, 0, 1, 3 );
// button b1
// weightx and weighty are both 0: the default
gbConstraints.fill = GridBagConstraints.HORIZONTAL;
addComponent( b1, 0, 1, 2, 1 );
// combo box
// weightx and weighty are both 0: the default
// fill is HORIZONTAL
addComponent( cb, 2, 1, 2, 1 );
// button b2
gbConstraints.weightx = 1000; // can grow wider
gbConstraints.weighty = 1; // can grow taller
gbConstraints.fill = GridBagConstraints.BOTH;
addComponent( b2, 1, 1, 1, 1 );
// button b3
// fill is BOTH
gbConstraints.weightx = 0;
gbConstraints.weighty = 0;
addComponent( b3, 1, 2, 1, 1 );
// textfield
// weightx and weighty are both 0: fill is BOTH
addComponent( tf, 3, 0, 2, 1 );
// textarea
// weightx and weighty are both 0: fill is BOTH
addComponent( tx, 3, 2, 1, 1 );
setSize( 300, 150 );
show();
}
// addComponent is programmer defined
private void addComponent( Component c, int row, int column, int width, int height )
{
// set gridx and gridy
gbConstraints.gridx = column;
gbConstraints.gridy = row;
// set gridwidth and gridheight
gbConstraints.gridwidth = width;
gbConstraints.gridheight = height;
// set constraints
gbLayout.setConstraints( c, gbConstraints );
container.add( c ); // add component
}
public static void main( String args[] )
{
GridBagDemo app = new GridBagDemo();
app.addWindowListener(
new WindowAdapter() {
public void windowClosing( WindowEvent e )
{
System.exit( 0 );
}
}
);
}
}
|