Virtual Machines (VM)
Now that you have an ESXi server with networking and storage configured it is time to build some virtual machines, firstly I will explain what a virtual machine is and what it contains, then we will build a Linux VM using local disks, we will also install VMware Tools to the guest O/S and the reason on why you should. I will also cover snapshotting a VM and finally I will show to how to create virtual machine from a physical machine using VMware's vCenter Converter.
There are a number of new features with version 4.1
A Virtual Machine (VM) is defined by a collections of files, when you create a VM you are creating a text file with the .vmx extension which defines properties such as
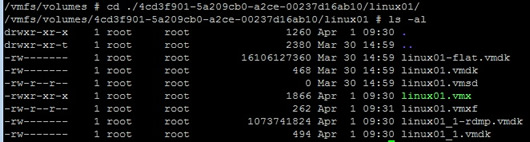
As I mentioned above a VM consists of many files as described below
| File Extension | Description |
| .vmx | Configuration file in text format, which means you can open it and read it |
| .nvram | VM's virtual BIOS file |
| .vmdk | VM's metadata/descriptor virtual disk file |
| -flat.vmdk | VM's data virtual disk file (OS/applications, data) |
| .vswp | VM's swap file |
| 00001.vmdk | Snapshot file |
| .vmsn | Snapshot memory file |
| .vmsd | Snapshot manager file |
| .log | Log file |
| .vmxf | Internal metadata file |
| .rdm | RDM file with virtual compatibility |
| .rdmp | RDM file with physical compatibility |
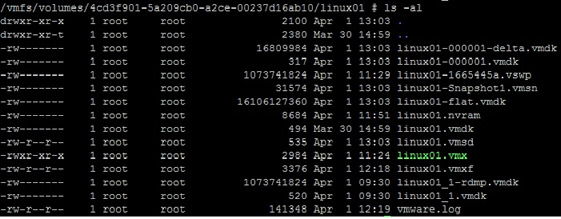
here is a listing from one of my Linux VM's
The VM itself presents the appearance of real hardware, even though we know it is actually software, the VM really does believe it is on a physical server and on its own. An ESXi VM actually uses an Intel 440BX-based virtual motherboard with a NS338 chip. This was selected because it had very good compatibility and reliability with many Operating Systems including very old O/S. The virtual motherboard can support the following
It is not possible to add a USB device and present it to a VM, it is used to address compatibility issues that have occurred with some USB redirection services commonly used in virtual desktops. Parallel and serial devices are not fully virtualized and their functionality is provided by the service console not the VMKernel. Also vMotion cannot use Parallel or Serial ports as you need to move the physical hardware attached to the parallel or serial port. However in all cases of USB, Parallel and Serial you can purchase a IP-based hub and redirect this via the network instead.
Physical CD/DVD and floppies are now rarely used, generally you convert them into ISO or FLP files, these can then be uploaded to a storage area within the ESXi server, I generally do this for my Linux ISO files, you can attach a ISO file to a VM and boot from this file.
Although you have PS/2 interfaces for a keyboard or mouse you interact with the VM via a remote console session in either vSphere client or vCenter, it's a bit like accessing a server via the ILO/IMM card. You can watch a VM boot up just like a normal physical server you can even send mouse or keyboard commands to the VM. When you first create a VM you are given a basic video SGA driver, after the guest O/S has been installed it would be wise to install the latest VMware Tools which adds a virtual video adapter driver and VMware virtual mouse driver, this will significantly improve graphics and mouse operations.
Many companies when changing over to a virtual solution is match what they had in the physical world into the virtual world even if the server was only using 10% of the resources, for example same number of CPU, same size of RAM which defeats the object of virtualization (reduce costs, etc), a better practice is to define the VM with the minimum that you feel your applications or services need to run, its very easy to increase CPU's or memory but much harder to take away resources, people do believe that when you take away resources even if the server was doing nothing that things start to go slow, etc. Make sure that you fully utilize your ESX hardware and keep resources to a minimum and only increase resources when there is a requirement to do so.
Before we create our first VM I have to discuss disk types within a VM, there are three of them
| thick/zeroedthick | then this type of virtual disk is created it takes up all the space you allocate, ESX virtual disks do not grow as more data is created inside them, this format offers the best performance. As a flat file, the virtual disk will be created in contiguous blocks within the VMFS volume. When the disk is created the file is created very quickly and any existing data on the physical disk is overwritten as data is written to the virtual disk as needed. |
| thin | with a thin virtual disk you may ask for 30GB disk, it actually grows in size as yo add more data, this is a good space-saving format for test VM's or VDI environments where you are trying to reduce storage costs. Note that this format is incompatible with the Fault Tolerance (FT) feature |
| eagerzeroedthick | if you use Fault Tolerance (FT) the disk will be create as this type, basically it is the same as a think disk in that if you allocate 30GB you get 30GB, however when a eagerzeroedthick disk is created it zeros all the blocks within the disk , it means it takes longer to create but is faster to read and write to because the free blocks are guaranteed to be blank and available for use. This is a major performance improvement which is need for FT to function correctly. It is also required for 3rd party software such as Microsoft Cluster Software (MSCS) |
Lets create our first VM, I will be installing the Oracle Enterprise Linux 5.5 as the guest operating, I will also be using a ISO file which will be stored on one of the virtual storage area's to boot from and perform the installation. I will give the VM 15GB of disk space and give it two Network interfaces (One on the public network and one on the iSCSI network) if you have setup a test environment like mine, then follow below, if not then use your own environment areas (storage, NIC's). I will first cover creating the VM and discuss how to manage the VM and what options you can change, I will then discuss how to get you ISO onto the ESXi server and how to install the guest O/S.
To create a VM you need open either vSphere client or vCenter
Creating the first VM
|
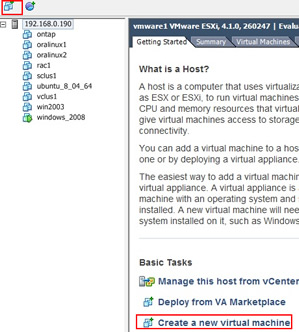
I have opened a vSphere client session and selected my ESXi server, from here if you click on the "getting started" tab you can see in the window a "create a new virtual machine" or if you look in the top left-hand corner the "New virtual machine " icon can be used
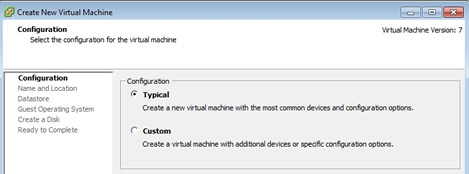
The next screen is the configuration screen, here selecting typical will select most of the defaults for you
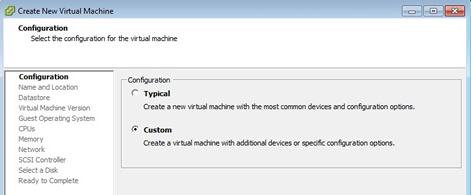
Selecting custom you can customize a number of options (compare the left panel with the one above), this is the one I will be choosing so that we can cover all the options.
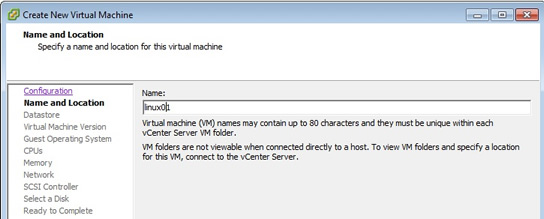
Next we can enter a meaningful name, I generally keep them the same name as the hostname
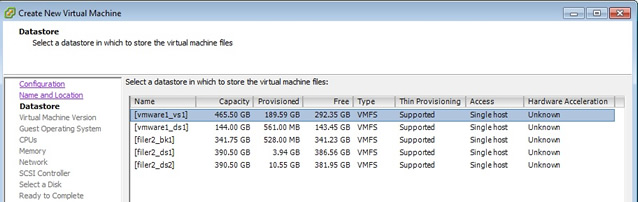
Next we can select one of our datastores, I am choosing vmware1_vs1 (Local 500GB disk) which means that this server could not be used in vMotion, we will be looking at vMotion in another section.
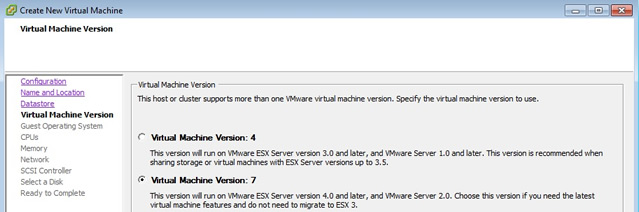
The next screen ask you what version of Virtual machine type you want to use, as you can see in the image, I have chosen the latest version, you can also see in the image what each version supports
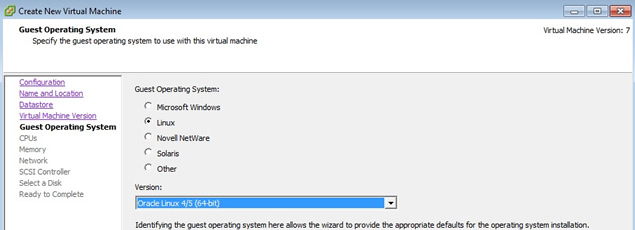
As I mentioned earlier I am going to put Oracle Enterprise Linux 64-bit as the guest O/S on this server. There a vast number of guest o/S you can choose here.
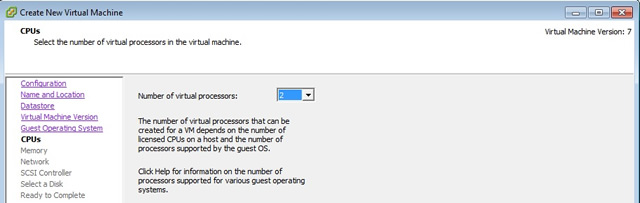
Now select the number of CPU's, remember if you are replacing an existing physical server with a virtual one, then try and reduce the amount of resources that you need, you can easily increase them.
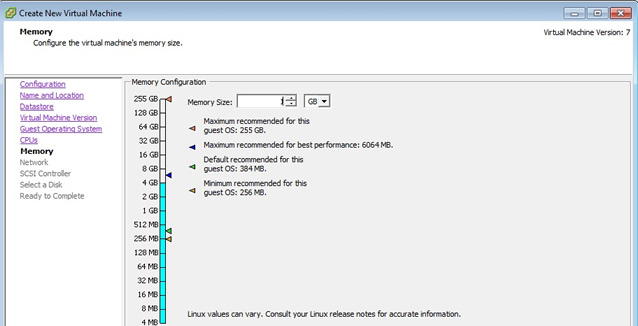
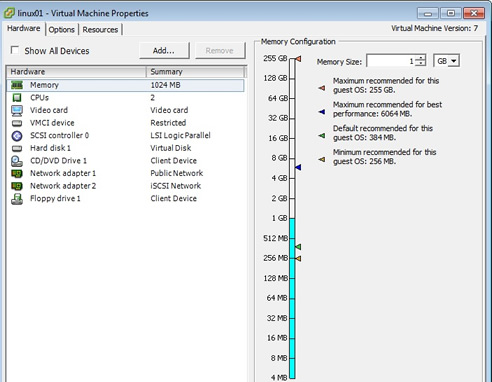
I have selected the minimum amount of memory for a Linux server, 1GB would be fine, again give the server as least as you can then start increasing if needs must.
Here I add a couple of virtual NIC's to my VM, one public NIC and one NIC which is attached to my iSCSI network.
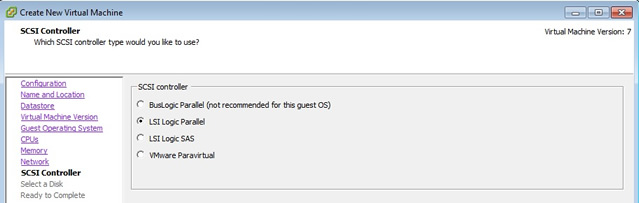
There are now four types of SCSI controllers you can use, it all depends on what guest OS you will be installing, the installation will basically pick the best one suitable for your guest OS, so I generally select the default
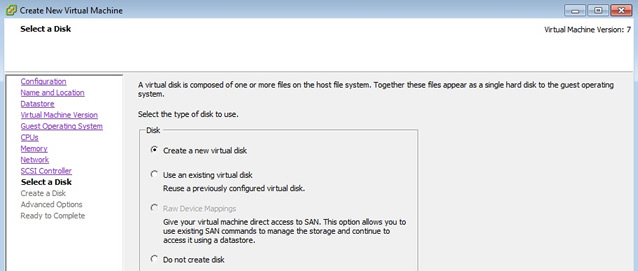
This is the file that will contain your guest OS, you can use an already existing disk or leave and configure it later, I selected to create the disk now
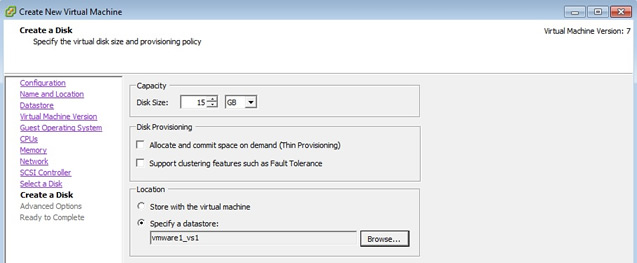
I give it a size, 15GB should be more than enough to install Linux (this will include the /, /boot and swap area), I have already discuss disk types above, here I am sticking to the default thick/zeroedthick but as it is only a test environment I could have chosen Thin Provisioning
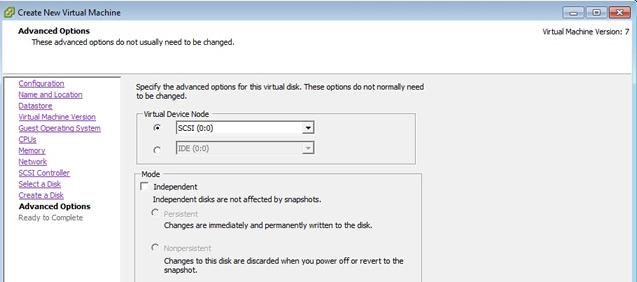
Because the VM has the appearance of real hardware it confirm to the SCSI convention adapter 0 and ID 0 are used as the boot disk (SCSI 0:0) with the SCSI adapter as ID 7. You can have up to 15 virtual disks attached to each adapter. You also have IDE support to allow you to use older operating systems (windows 95, windows 98), again the ESXi server will generally pick the best solution for the guest OS you chose.
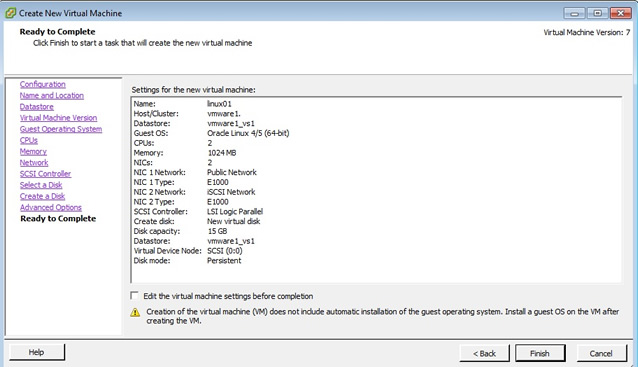
Finally you get to the summary screen, click finish and the virtual machine will be created
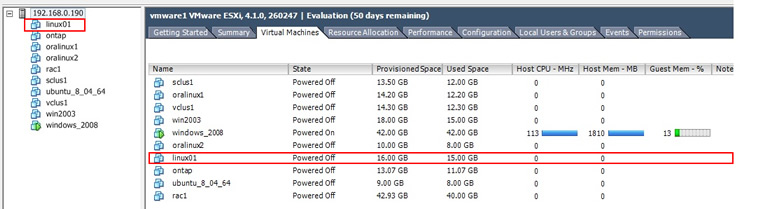
In the main window on the vSphere client you should see it being created, I was not quick enough as it created before i took the snapshot.
In the Virtual Machines tab of your ESXi server you should be able to see it
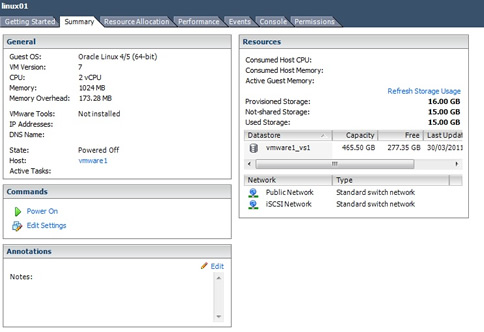
if you select the VM and click on the "summary" tab to can see what the VM has installed, you can see the 2vCPU's, 1GB of memory, the two NIC's and the disk allocated to it and where its virtual disks are located (vmware1_vs1)
|
Now we have built the virtual machine it is now like a physical server with no operating system installed, you can power it on but it will not boot anything, but before we install the guest OS lets see what we can do with this VM, I am not going to explain all the features but highlight a few that I commonly change, some of the advanced features will actually be covered in other sections of my web site, I will be updating this section from time to time when I do get a change to play around with the related feature.
Virtual Machine |
|
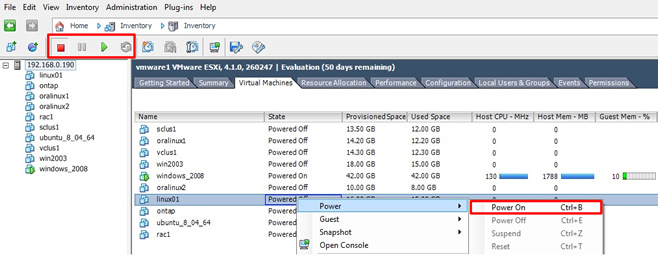
| Power on/off | There are a number of places where you can power on/off/restart your VM, selecting the ESXi server and then clicking on the virtual machine tabs, you have two ways
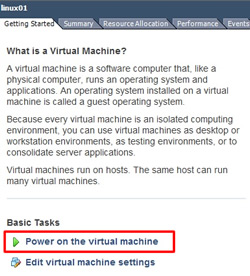
If you select the virtual machine and select the "getting started" tab, you have another way
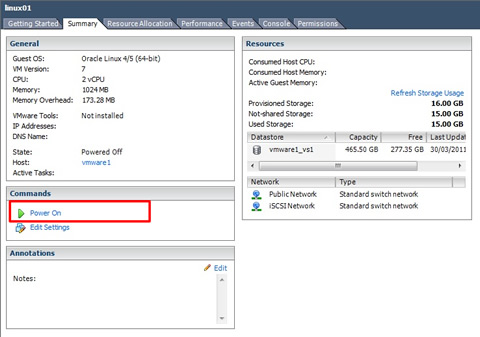
There is also one way in the "summary" tab, this will change to power off and restart when the VM is running
|
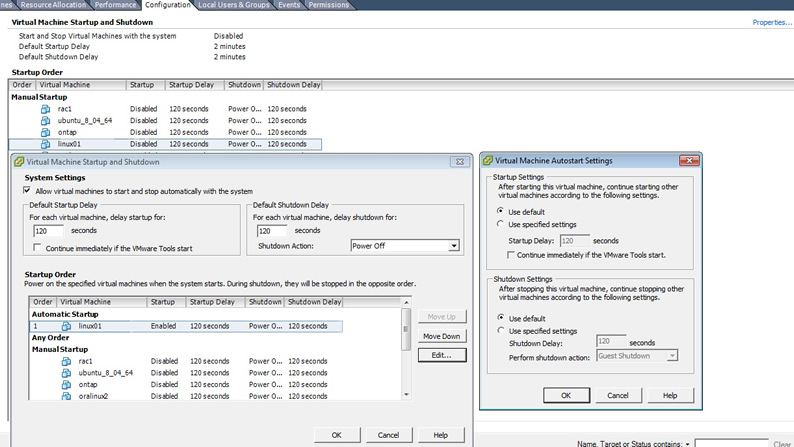
| Automatically start and stop a VM | ESX has the ability to gracefully power off and on your VMs if you chose to shut down or reboot a ESXi server, this guest shutdown feature requires you to install the VMware Tools on to each VM. If you use features such as vMotion, DRS and HA do not use this feature as it can cause all sorts of problems
|
Virtual Machine Hardware |
|
| Add/Remove and Display the VM's hardware | By selecting the "edit settings" in the VM "summary" tab, we can additional hardware such as
By adding a hardware component you will be taken to the similar screen you used to create the virtual machine screen, now you can see why I wanted to show you the custom setup.
|
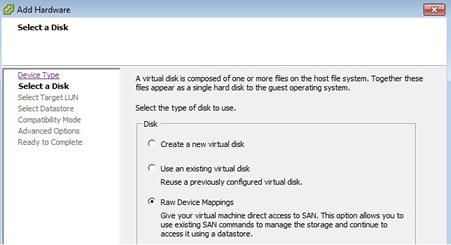
| Giving a VM direct access to a SAN or iSCSI | There are times when you want you VM to have direct access to a SAN or iSCSI, this ia achieved by a special mapping file called RDM (Raw Device Mapping), this metadata text file tells the VM which LUN to access, the VMkernel intercedes (binary translation) on its behalf using the VMKernel drivers to access the SAN or iSCSI via the ESXi hosts physical HBA There are several reasons to use RDM files in preference to virtual disks
The maximum size a RDM file can be is 2TB, there are two compatibility modes, note that you can convert a RDM file into a virtual disk file this can be done with either vMotion (SvMotion) or via cold migration, we will cover this in my vMotion section.
RDM will have a .vmdk extension just like virtual disks, they can be stored alongside the VM's other files or in a different datastore. To create a RDM file for a VM follow below, right click on the VM (you can use the newly created one called linux01 above) and select "edit settings", then click the "add" button, then choose "hard disk" and the below screen should appear, select "Raw Device Mapping"
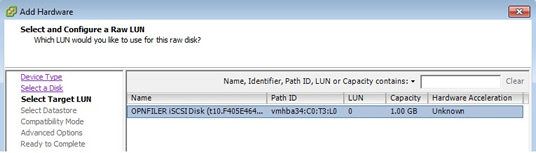
I create a 1GB iSCSI volume on my openfiler iSCSI server, to use for this demonstration
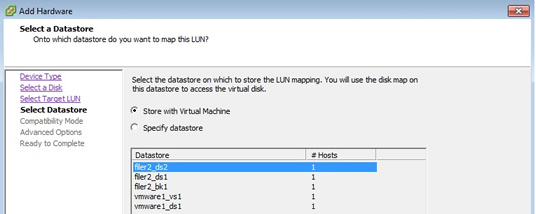
I prefer to store with the VM as it keeps it all tidy but you can select a different datastore location if you wish
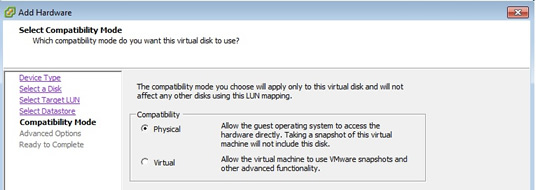
Now we come to the compatibility mode, again if you are going to use this with a cluster or as a quorum device you should select physical, otherwise select virtual
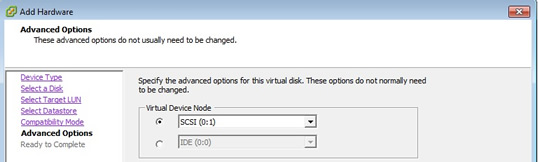
You can specify the SCSI LUN location, but generally the default is OK
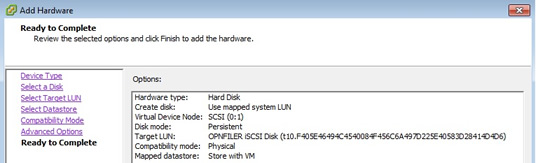
Finally we get to a summary page, make sure you are happy as there is no going back
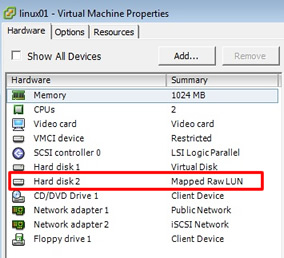
You now should be able to see it in you hardware tab of the VM
You can also see it in the VM volume directory, its called "linux-01_1-rdmp.vmdk", when we build the guest OS it will be available to the VM to use.
|
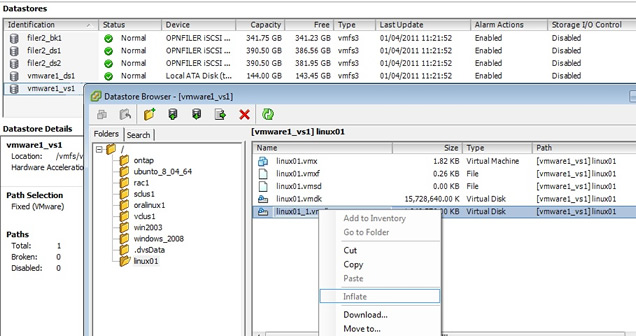
| Convert a thin disk to a thick disk | In older versions of ESX you had to use the vmkfstools command to change a disk type, the VM must be powered off and then locate the virtual disk that you wish to convert and then right click in the virtual disk and select "inflate", I have located the the linux01 virtual disk in the vmware1_vs1 datastore, using the datastore browser and selecting the linux01 folder I have access to the virtual disk.
|
Virtual Machines Options |
|
| VM's options | There are a number of options you can change
Most of the the time I leave them on the default settings
|
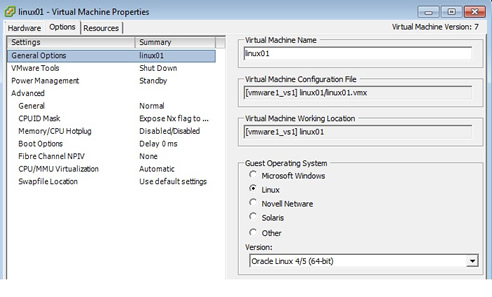
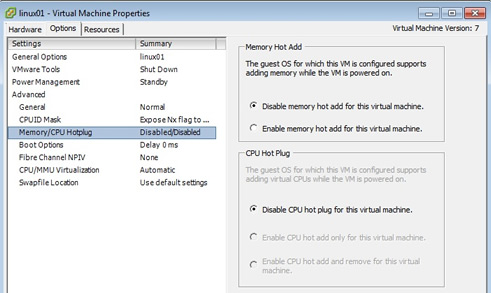
| HOT pluggable CPU and Memory | A number of OS support hot adding, thus when you add an additional CPU or memory will be available to the OS immediately, you can enable this feature from the options tab and selecting "Memory/CPU hotplug"
|
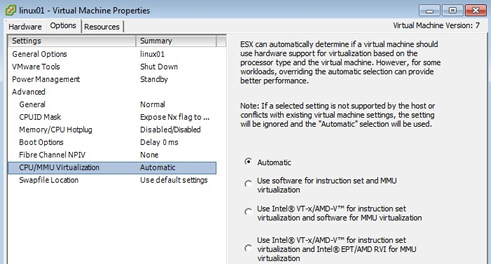
| Memory Management Unit (MMU) and Paravirtualization | VMware has three types of execution
The MMU (Memory Management Unit) is called the Hardware Page Table Virtualization, it may or may not improve performance, it all depends if you CPU supports this feature and if you workloads are memory-intensive. Within the VMkernel, there are two page tables one for VM memory the other for physical memory, the VMkernel maps the hexidecimal memory ranges from one to the other. As the VMkernel is fundamentally the attributer of access to hardware this allows for avoiding the duplication of memory connects within and between VM's commonly referred to as Transparent Page Sharing (TPS), it also allows VMware to deallocate memory from one VM to another using a memory driver installed to the guest OS along with VMware Tools. This does in additional CPU costs, both Intel and AMD offer in there new CPU's hardware-based page table system, commonly referred to as Nested Page Table (NPT). The VMkernel will interrogate the CPU and allow the VM to use the MMU if it is available, otherwise it simple ignores it.
|
Virtual Machine Resources |
|
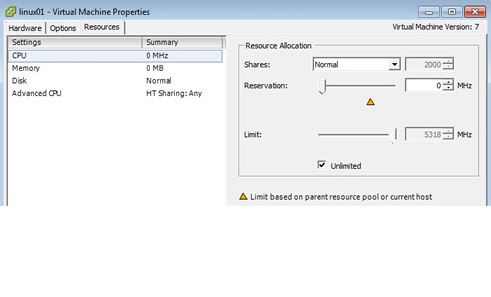
| VM resource allocation | The last screen is the resource allocation, which I will be covering in great detail in the resource monitoring section
|
Guest OS installation and VMware Tools
If you have followed the above on how to create a VM, you should be in a position to install the guest OS, I am going to install Oracle Enterprise Linux 5.5 and then install VMware Tools. Firstly we must get the ISO image onto a datastore
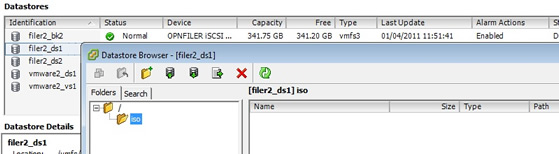
Using either the vSphere client or vCenter go to the datastore store screen, right-click the datastore and select "browse datastore", I have created a folder in datastore filer2_ds1 called iso, this is where we will put the iso image
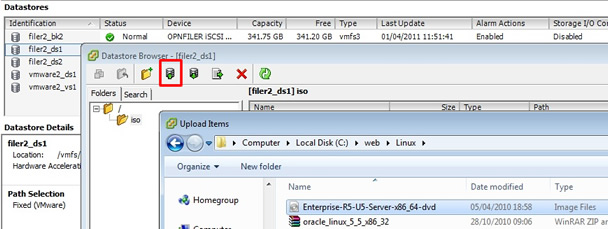
I have downloaded Oracle Enterprise Linux 5.5 64-bit from Oracle's website on to my PC.
Now select the upload button and select the downloaded ISO image
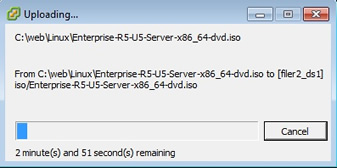
You should now see a screen indicating how long it will take to upload the ISO image to the datastore
Finally you should a screen similar to below, which means we can now use this image to boot and install Linux onto our VM
|
Now that we have our ISO image on a datastore lets install the guest OS
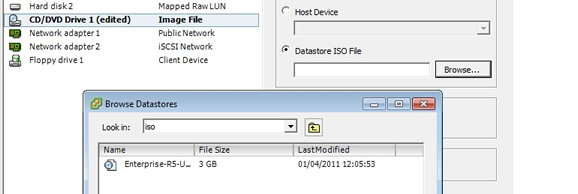
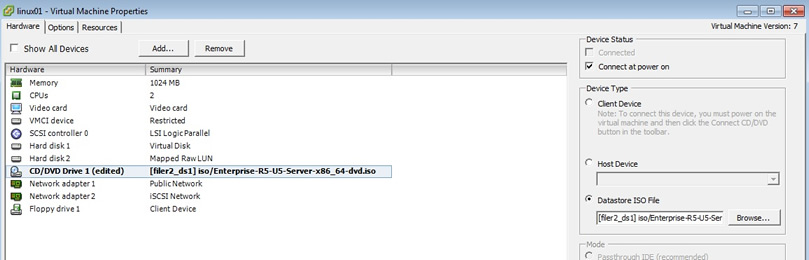
| Installing the guest OS (Linux) | The booting of an iso image is the same for all OS's, first select the VM and right-click and select "edit settings", then select the CD/DVD drive 1, then click the "DataStore ISO file" radio button then select the "browse.." button, find your ISO image
Once selected you should have a similar screen below, make sure the "connect at power on" button is ticked.
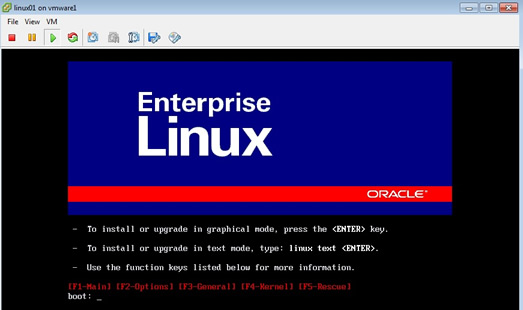
Now power on the VM and open a console and install the OS as normal
|
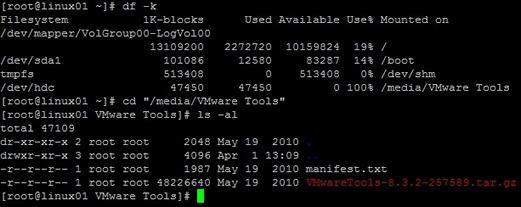
After you have installed the guest OS you should really install VMware Tools which is a software package that contains three components
| Drivers | Many drivers are installed VMware SCGA II, VMware mouse, VMware SCSI, AMD Enhanced NIC driver, a file system synchronization driver (used with VMware Consolidated Backup and the new VMware Data Recovery (VDR)) and a memory control driver (vmmemctl). These devices and drivers greatly improve performance. |
| Heartbeat service or daemon | The heartbeat or daemon service is used to alert the administrator that the guest OS inside the VM as malfunctioned, if a VM hangs (BSOD windows or Linux kernel panic) you will see the green icon in vCenter change to a red exclamation mark |
| Configuration applet or script | these scripts are used to configure VMware tools after the installation of VMware Tools |
To install VMware tools follow below
| Windows |
In the background Windows will connect to a ISO file called "windows.iso" held on the ESXi server, hopefully Windows will automatically run this CD and execute the VMware Tools.msi file. |
| Unix | In Unix there are a number of different types of packages depending on the guest OS installed, I will describe the Linux installation process
You should be able to see the VMware daemons running on your system
|
That's all there is to talk about VMware Tools, but I do strongly advise you to install the latest version.
Snapshots have much the same functionality as redo files, plus some extra features, they allow you to capture the state of a VM at a single point in time (which includes both disk and memory states)., they can be created and deleted even when the VM is powered on. When you create a snapshot, all the new changes in the disk and memory are actually going to a differences or delta file, its like a bookmark that you can use to return to a set point.
You would use snapshots when you want to make fundamental changes to you VM and you are unsure on what might happen (could completely trash the system). When a VM snapshot is applied, all the read and write events that would normally go to the virtual disk actually get sent to a delta file, normally the virtual disk locked by the file system and cannot be manipulated, however when a snapshot is applied the virtual disk is unlocked and can be copied to another location for backup purposes. Bear in mind that if you revert to an older snapshot any data entered into the system after the snapshot will be lost.
There have been reports that snapshotting having problems with committing snapshots above 2GB and that the management of the snapshot files is poor, thus the VMware communities suggest that it should be used sparingly and restricted to test and development environments. The other problem is that snapshots grow incrementally in blocks of 16MB, if you forget that you taking a snapshot it could become very large, VMware does now have alarms to monitor snapshot usage.
Lets create, revert and delete some snapshots
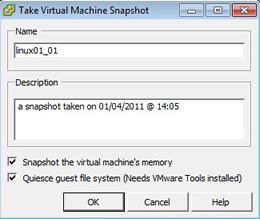
| Create a snapshot | I am going to use my Linux VM I created earlier (linux01) which is powered on and running, to create a snapshot right-click the VM and choose "snapshot" and then select "take snapshot", a dialog box will appear, you can supply a meanful name, a brief description and you can quiesce the file system, if you wish.
If you list the volume on the ESXi server you can see the snapshot delta files
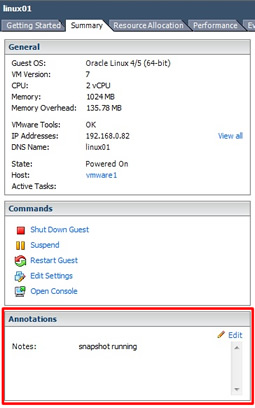
I sometimes leave a note on the VM configuration tab to let me know I am snapshotting
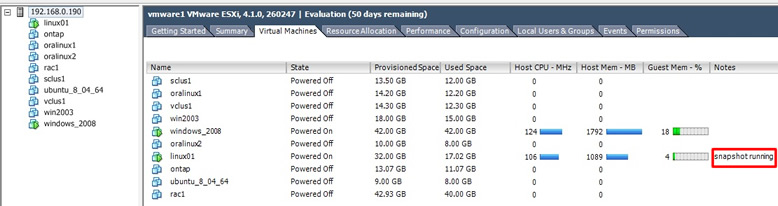
This then displays in the main vSphere or vCenter virtual machine screen
|
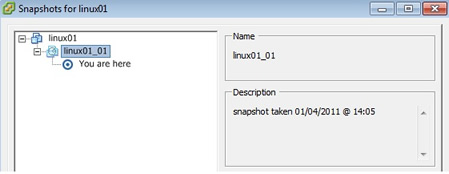
| Reverting to a snapshot | You can use two ways to revert to a snapshot, reverting to the last snapshot (quick way) or use snapshot manager, the quick way you right-click the VM, select snapshot, select "revert to current snapshot", if you want a particular snapshot, right-click on the VM, select snapshot, then select snapshot manager, as you can see below you then can select which snapshot you want
Although you have reverted you are still have the snapshot feature engaged ans thus the delta files will continue to grow |
| Delete a snapshot | The delete option is also in the snapshot manager screen, just select the snapshot that you wish to delete, or you can delete all of them. When you delete a snapshot VMware takes the contents of snapshot and copies the data in the delta file into your virtual disk, once this merger has taken place the delta file is deleted. |
P2V of a physical Machine with vCenter Converter
As this section is getting long, I will create another web page for this subject called P2V.
Again I will create another web page for this subject called Rapid VM Deployment.


 |
|